Well, to say that a lot has happened since Part 3 would be something of an understatement. To recap: Defense Distributed tried printing my AR lower STL on an Objet machine, but it only held up for 6 shots. While much was made in the media about this ‘failure’, I thought it was actually an […]
Well, to say that a lot has happened since Part 3 would be something of an understatement. To recap:
Defense Distributed tried printing my AR lower STL on an Objet machine, but it only held up for 6 shots. While much was made in the media about this ‘failure’, I thought it was actually an excellent demonstration of material properties in the two different 3D printing technologies used. My FDM printed lower used material with a higher impact strength, while the Objet printed lower was stiffer. As a result, mine flexed and would not cycle properly with .223 ammunition, while Defense Distributed’s lower cycled perfectly with 5.7x28mm ammunition, but fractured at the root of a buffer tube thread (interesting how the extreme detail afforded by the Objet process actually created stress risers due to the threads in my STL model being perfect ‘V’ profiles with no filleting of the thread roots). They’ve since refined the model to hold up for 600+ rounds, which is quite impressive for a photopolymer.
Representative Steve Israel started calling for renewal of the Undetectable Firearms Act, and has also called for making 3D printed firearms and homebuilt ‘undetectable’ polymer magazines illegal. I’m taking this somewhat personally, as he keeps using a giant photo of my AR lower as .22 pistol during his press conferences – the least he could do is put my URL on the photo to provide proper attribution. Given that some of the most popular rifle magazines commercially made today are of polymer construction, I’m not sure what he’s really hoping to accomplish by expanding a law that was passed due to media hysteria over the introduction of the ‘plastic’ Glock pistol. Wait, media hysteria over plastic guns? The more things change, the more they stay the same…
After the horrific shooting in Connecticut, Thingiverse pulled almost all of the firearm related files, including my AR lower and a Magpul style trigger guard I had designed. I immediately contacted their legal counsel and pointed out that a trigger guard is a rather important safety device and has use in paintball and airsoft, not just firearms. The response was ‘our sandbox, our rules, and we can change the rules at any time’ (but spoken in far more lawyerly terms). An AR-15 grip that had also been taken down was reinstated a few days later, so I’ve been asking how to get my trigger guard reinstated as well. However, my requests appear to be ignored, and I’m somewhat giving up on Thingiverse at this point. It’s still a great community, but when I can’t use it to share with other gunsmithing hobbyists or even paintball and airsoft enthusiasts, my desire to use it naturally diminishes. Meanwhile, Thingiverse appears to have no issues with people sharing drug paraphernalia designs, so maybe they’re attempting to cater to a rather different group of ‘hobbyists’.
For anyone interested, I have a copy of my original AR lower STL here (though I don’t really recommend it at this point – there are much better 3D printable lowers that have been designed and refined by other folks). I have a copy of the trigger guard here. It comes in two versions – one is the standard version that uses a roll pin through the rear holes, and the other I designed to be a tool-free version that uses angled studs to snap into place. I’m actually rather proud of this version, and would be happy to hear feedback on it.
Back to the present – I really haven’t done anything further with the printed AR lower, as I’ve been experimenting with a different firearm platform. Commenter Allen had asked “Could the Ruger 10/22 receiver be built the same way?” This certainly got me wondering, as the 10/22 receiver, unlike an AR-15 lower receiver, is what the barrel attaches to, and contains the reciprocating bolt. Additionally, the fire control group (trigger, hammer, etc.) is contained in a modular pack rather than having those components fitted individually to the receiver. Plus, answering this question seemed like an excellent excuse to finally purchase a 10/22 – like the AR-15, it’s an incredibly popular rifle with countless aftermarket accessories available. Additionally, it’s a great platform to learn the fundamentals of proper marksmanship (one of the many skills that I’d like to learn one of these days).

I found a very well used one at Gander Mountain for a reasonable price – the sling swivels had apparently broken off long ago and the receiver finish was a bit worn, but it looked to be in good functional order and would do well for learning how the rifle operates and is constructed. When I got it home, I eagerly dug into the disassembly to see how it functioned and to give it a much needed cleaning. The 10/22 is a semiautomatic, blowback operated .22 rifle. The blowback operation means that unlike the AR-15, the bolt is not locked into place when the gun is fired and is only kept forward by means of the recoil spring. A blowback bolt is also quite heavy in comparison to the cartridge used – this is to ensure that the bolt begins its rearward travel in the firing cycle slowly enough to let the chamber pressure decrease to a safe level before the spent cartridge is extracted. The receiver itself is cast, though there are aftermarket billet receivers available for those looking to heavily customize the rifle. In looking at how the bolt reciprocates in the receiver, it appeared that there should be no issues with a 3D printed receiver, provided that the print is made so that the layers are parallel to the barrel axis (to provide as smooth a surface as possible for the bolt’s travel).
For the printed receiver itself, I again turned to Justin Halford’s cncguns.com for an IGES file. Unlike the AR-15 lower receiver, there weren’t any design features that I felt needed strengthening right away, so I created an STL file directly from the solid model and set it running with the same Bolson black ABS I had used for the AR lower. I printed the receiver upside down so that the interior didn’t need any support material, and thus would provide as good a finish as possible.

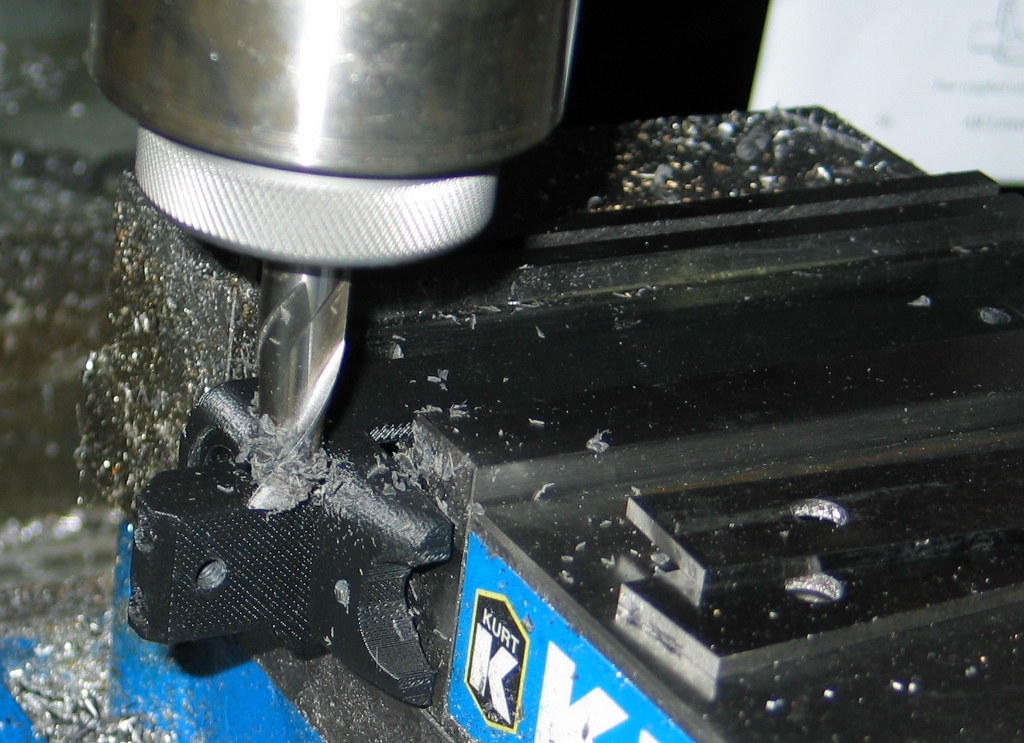
After removing all evidence of support material, it was time to start fitting parts. Chief among these is the barrel itself, but the hole in the receiver was slightly undersized (not unexpected, and better than being oversized). I clamped it to the angle plate on the mill and indicated it in vertically with a dial indicator and coaxially with a Blake co-ax indicator before opening up the hole with the boring head.

After bringing the hole to appropriate size (I could just begin to insert the barrel shank), I tapped the barrel clamp holes with 12-24 threads (thanks to the blueprints at fireamfiles.com) as well as the stock mounting screw hole in the front tang.

Next was to actually test installation of the barrel itself, which tightened up nicely, but I noticed that the barrel would visibly cant downward as I tightened the clamp screws.

After removing the barrel, I saw that there wasn’t quite enough clearance on the front counterbore, and the back of the barrel was catching on the top front edge of the receiver. So it was back to the boring head to enlarge the diameter on the mating face slightly.

Then, it was time for a test fit of the bolt – it was a tight squeeze to get it past the rail on the inside right of the receiver.

As it turned out, I think the rear wall of the receiver in the original IGES file may be a touch too thick, as I also couldn’t get the trigger pack installed, so I thinned out the rear by perhaps 0.030″ until I could just get the retainer pins to go through the receiver and trigger pack (I had already reamed out the holes in the receiver at this point).

With that done, I could finally fit all the internals and actually dry fire the gun.

However, when I tried to drop the receiver assembly into the wood stock, it wouldn’t fully seat. After fumbling with it for a few minutes, I noticed that there is an extra relief cut on the original receiver at the interface between the tang and the receiver front. As it turned out, the original IGES file does indeed have this relief cut, but when I brought it into SolidWorks, I had run a feature recognition pass on the part. For some reason, SolidWorks removed this feature – I should have just done a direct export to an STL file instead! Oh well, one last machining pass on the mill took care of it.

The barreled action fit just fine in the stock, and both the 10 and 25 round Ruger magazines fit, though perhaps a little more loosely than desired.

Today I took it to the range and found an accomplice to act as a model. Naturally, I let him burn through some rounds on the 3D printed AR receiver configured as .22 pistol first. A .22 AR pistol is kind of a ridiculous contraption, but it is also ridiculously fun.

Next was the test of the printed 10/22 receiver. As with previous testing, I started with only 1 round in the magazine and worked my way up. Things were running just fine, so I put in the 25 round magazine and let ‘Secret Agent Man’ have some trigger time with it.

Generally, it ran nicely, though we did have some feed issues with it. I think the fitment of the magazine could be to blame, as it seems that the front of the magazine is able to tip down a little too far. Both magazines are also absolutely brand new (this was their first usage), and I’ve been told that 10/22 magazines operate better after an initial break-in period.

So there you have it – a 3D printed 10/22 receiver is entirely feasible!
Thanks for the update, very interesting!
Hi,
I always love your posts, they are detailed, full of good pictures and properly researched.
Couple of weeks back I was reading your old articles, especially those of about your 3D printer.
And Im wondering since then, how exactly the Z axis are constructed in it.
No other high definition picture is at on the web, and what is most itching me is the lack of a saddle plate. Any proper CNC machine has one for each axis where the linear shafts are bolted to, and it prevents twisting or other play while moving.
So without a saddle plate you should see a wobbling effect on your print, yet you don’t have one.
If you are out of ideas about what to write, then here is a pointer:)
Best,
Laszlo
Thank you for the kind words! I picked up another Stratasys FDM (a 2000) the other week and hope to make a post on getting that one running, so perhaps I can take a few photos of the table. But to describe the system, there really isn’t a saddle plate, as there is more than 1 leadscrew! The bed is just like that on the old Darwin model of the RepRap – there is a threaded Acme screw on each corner, and they all rotate synchronously to raise and lower the bed. That takes care of any up/down wobbling, but doesn’t constrain the bed from moving within its own plane. For that, there is a guide shaft located between the front and rear leadscrews on each side, right at the center edge of the table. A collar bushing on each side of the table is apparently all that is used to engage the guide shaft – nothing even as fancy as a linear bearing! (at least on my 1600 – I’ll have to check the 2000 and see if it’s the same).
Fantastic job here! I’ve always loved the 10/22, a classic rifle, but always in the process of improvement. You’ve just added another possibility of customization for the 10/22. This proof of concept allows a custom 10/22 down to the core or even better-designed 10/22 receivers.
Btw, how’s the accuracy? precision? That might be an area of improvement.
How does it handle heat? Right now, it’s winter, but summer conditions will probably be drastically different.
I wasn’t expecting a build, but sure am glad you made it. I believe you’ve made thousands of Ruger owners (potentially millions) happy today.
Thanks for inspiring me to investigate the 10/22 – it’s a fun little rifle, and I’m very glad I bought it. Accuracy & precision is something I’d like to investigate once the weather warms up. My hunch is that accuracy/precision will be pretty much the same with the printed receiver when using the factory iron sights (as both are mounted to the barrel itself). However, if using a receiver mounted scope or aftermarket rear iron sight, I expect to see very poor accuracy – given that the barrel would tip down with every turn of the clamp screws during the initial barrel mount, it’s not conducive to accuracy. The printed receiver is far more flexible than an an aluminum receiver, and is really quite impractical at this point (I wouldn’t want to do mag dumps in the summer due to heat concerns, to answer your other question).
However, a printed receiver is great for testing out concepts – if you’re wondering if you should really drop the coin for a billet receiver with integral Picatinny rails for example, you could just print one out, fit all your components and head to the range to see how well you like the ergonomics provided by such a platform! I think it’s a great way to play “what if” with your guns without having to spend the money for the actual parts. Now, if I only had CAD files for a High Tower Armory 90/22 stock kit…
As for accuaracy, it shot high and a touch to the right at 25yds. I would have liked more time, a couple extra targets and a couple flavors of ammo to try to see if the grouping improved or got worse. Also, shooting the printed one compared to the stock receiver in terms of accuaracy and reliability… It would also have been neat to see if the failure to feed we experienced could have been cured by lubing things inside the printed receiver.
Just. Plain. Amazing. In-depth. Overview.
Not sure what else to say, this blog post really made my night!
I can still remember when Reason first covered what you did and linked to your posts on the AR-15 forums. Boy have times changed…
As for the HTA 90/22 CAD files, wouldn’t it be more practical to use an injection molded chassis? A fellow on Youtube a while back had a conversion vid about using a gutted Airsoft P90. They’re less than $40 from some vendors. Just use the 18 inch barrel to maintain the minimum legal OAL, bend the transfer rod for the trigger, and you’re GOLDEN! You might even take some measurements of the trigger shoe and print a replacement shoe for the transfer rod.
Thanks for the intuitive blog and making the STLs available. I’m not printing yet but planning on a Rostock variant in the near future.
Can you recommend somewhere that still has files for these since the jackasses at thingverse removed your stuff?
They are linked to right in the post itself.
Gah, I must be stupid or something. Do you have the files for the current version? I’m probably missing it, but I’m only seeing links to the old version of the receiver. Thanks!
Respectfully,
Ethan
The AR-15 lower receiver I mean.
The FOSSCAD repository has pretty much everything you could want.
I saw the Forbes article on the Lulz Liberator, but I haven’t seen you write it up yet.
Have you looked at black powder? Modern black powder rifles (inline muzzleloaders) are totally legal to mail order, and they do what the liberator does. The liberator could easily be made into a black powder firearm simply by adding a primer to the back. The basic idea is caseless ammo.
I’ve certainly thought about black powder, but I have zero experience with muzzleloaders myself. But I agree that the concept would probably work well, especially given the lower pressures generally seen in BP rifles.
I wish you were an attractive young woman so I could marry you.
If you ever meander through Virginia, I have some homebrew hard cider for you.
I’ll take that as a compliment! 🙂
How long did it take to print the 10/22 receiver?
It’s on another computer, so I can’t check, but it was probably around 18-20 hours (my machine is pretty slow, though).
I would be interested in finding a left handed model of the 10/22. I have a particular design in mind that would require that.
You can take the IGES file from cncgunsmithing.com and simply mirror the solid to flip the ‘handedness’ to get a lefty receiver. Of course, you’d have to also flip a few other items to account for the ejection now happening on the left as well.
Great post! In Canada the all seeing and all knowing government has arbitrarily decided to ban hi-cap Ruger 10/22 mags, or at least limit capacity to 10 rounds. 22 calibre rim fire is exempt except for hi-cap Ruger. So, like everything else in Canada you pin your mags to 10 rounds max. The Ruger fell foul of this restriction as there is a 10/22 pistol which fits rifle mags and therefore 10/22 rifle mags must be pinned (cuz you can’t have more than 10 round in your handgun). There is an adapter which allows Remington mags to be used in the 10/22 and this is completely fine (??!!). Anyway I don’t understand as if the adapter fits the rifle it should fit the pistol and it’s square 1 again, I guess that did not occur to the powers that be.
My scheming head thinks that maybe a printed 10/22 receiver with a Remington mag well might be a single piece solution, and probably quite marketable or anyway, extremely well received by the shooting, 3d printing, enthusiasts out there.